Below are some simplified diagrams on how the system works. They do not show all the parts such as the arm stabilizers, which prevent the arm from overbalancing too far. Also the catchment shown is not the same shape as the one on the sensor. The reason it is shown this way is so the system can be explained easily.
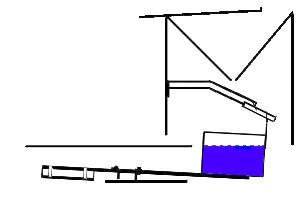
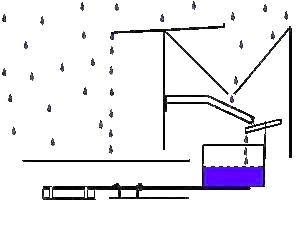
Referring to Figure 6 below. The sensor tips into this position to terminate irrigation. It has overbalanced on and is balancing on only the right hand pivot. The left hand pivot is above the platform and is not resting on anything. The switch is open. After the irrigation has ceased water evaporates from the Water Reservoir so that the reservoir loses weight.
Figure 6
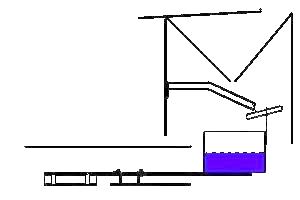
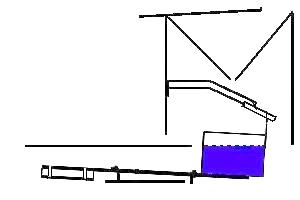
After a small amount of water evaporates the arm will overbalance into a horizontal position and rest on both the pivots as shown in Figure 7 below. At this point the switch remains open so that no irrigation can occur. The arm will rest in this position for most of the time.
Figure 7
The amount of water, which needs to be evaporated from the water reservoir before the arm overbalances into the position shown in figure 8, depends on the distance between the two pivots. This distance is simply adjustable which enables you to adjust the amount of water that will evaporate between waterings. The larger the distance between the two pivots, the greater the amount of water that needs to be evaporated between each irrigation.
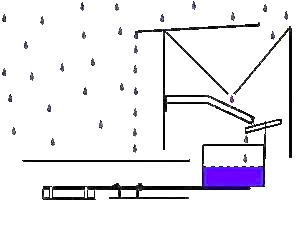
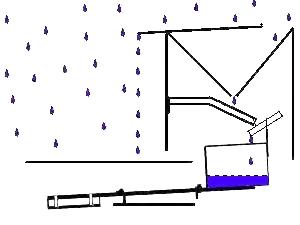
When the critical amount of water evaporates from the water reservoir the arm overbalances on the left hand pivot as shown in Figure 8 below. This closes the switch to enable power to the solenoids so irrigation can start. Figure 8 also shows how the water lands in the catchment and flows down the chutes into the water reservoir. The swiveling chute pivots on the fixed chute so that water is directed into the water reservoir.
Figure 8

The arm then overbalances back into the horizontal position where the switch remains closed and the irrigation continues as shown in figure 9 below.
Figure 9
The arm will remain in this position until the water reservoir refills and the weight of the water overbalances the arm on the right hand pivot into the position shown in figure 6. This opens the switch and terminates the irrigation. The cycle then continues.
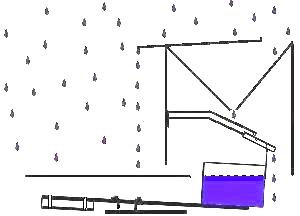
Rainfall will also replace the water in the water reservoir. If the container is full and it keeps raining the swiveling chute will direct water away from the water reservoir to prevent the reservoir from overfilling. This is shown in figure 10 below.
Figure 10
The left hand pivot normally remains in a fixed position while the right hand pivot is slid to the desired position on the scale and simply tightened with a wing nut.
If you need to water very frequently you can use a single pivot. The right hand pivot can be simply removed or slid away from the platform so it is near the container. In this case the arm would not rest in a horizontal position. When the container dries out the arm will overbalance on the pivot so the switch closes and irrigation commences as shown in figure 11.
Figure 11
The irrigation then fills the container until it overbalances in the opposite direction as shown in figure 12. This opens the switch to stop irrigation. The cycle would then continue.
Figure 12
If you need to water extremely frequently such as every few minutes there is a special cloth that can simply be attached to the container. This increases the evaporation from the container by a predictable amount. Different sized cloths are available to increase the evaporation by different amounts.
The catchment area can also easily be adjusted by a slide, which simply slides into the position you want. The slide covers part of the catchment. The catchment area determines the ratio of the amount of water you apply in irrigation to the amount lost in evaporation. If the catchment area is the same as the area of the container's opening, then you will be applying the same amount of water as you would lose in evaporation from the container. However the adjustable catchment area would enable you to apply much less than this or much more. The ratio is called the crop factor and recommended figures are available for different plants. Figure 13 shows how a small catchment would allow little water into the container and hence you would apply more water during the irrigation.
Figure 13

However if you want to apply less water you would adjust the catchment to the position shown in figure 14 which will allow more water into the container. Therefore the container will fill quicker and irrigation will be terminated sooner. This will mean that less water will be applied during the irrigation.
Figure 14
These adjustments enable efficient use of water.
Water that lands on the catchment's adjustable slide will run away and not be caught in the container.